Thai Chicken Collard Wrap

Thai Chicken Collard Wraps

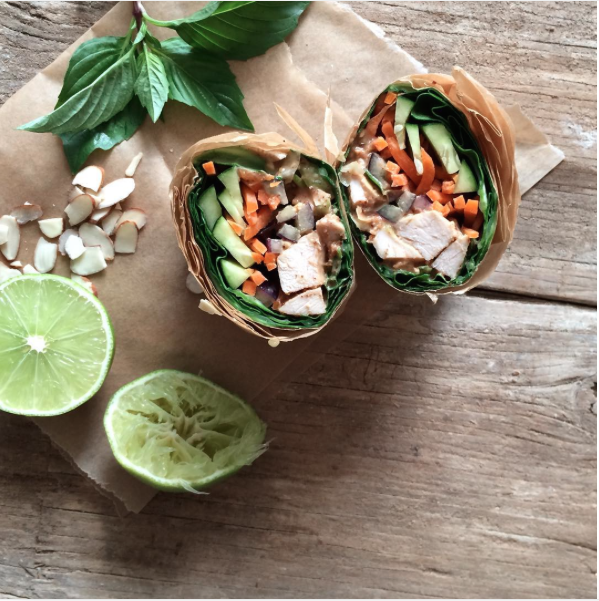
I’m having a love affair with collard greens and I’m not sorry. Move over bread and tortillas, there’s a lean green wrapping machine that is taking your spot in my lunch bag.

After having a wrap at my nearby PCC market, I was in heaven. The next day I purchased my very own collard greens and have made wraps for lunch ever since. The beauty about these leaves is that they are tough enough to withstand being filled with goodness and then left to sit in the fridge for 3 days before you eat them. Bread, however, is usually partially soggy by the time I get to work.

This past Sunday, I prepped enough wraps for lunch for the week, then just grabbed them out of my fridge each morning on my way to work. SO EASY! Although you could do just about anything with a collard wraps: humus and veggies, turkey caesar, southwest chicken…… this week it was all about the Thai chicken wrap.

Thai Chicken Collard Wrap

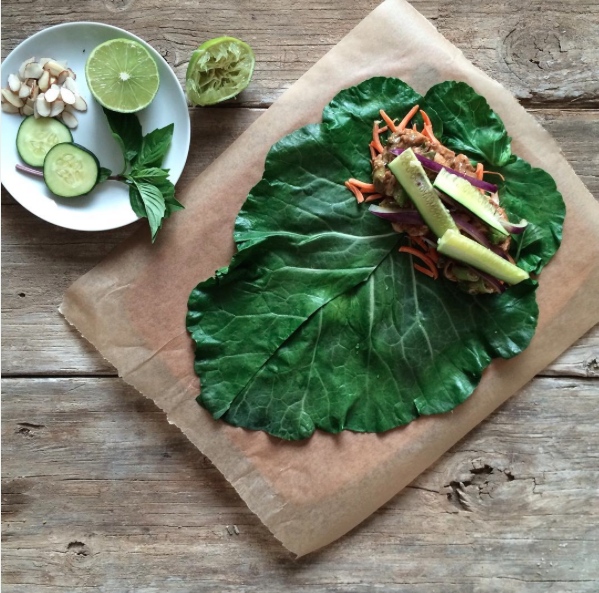
Collard Wrap with Spicy Almond Butter Sauce, Chicken, Cucumbers, Carrots, Bell Pepper, and Thai Basil Leaves

Thai chicken collard wrap

  • Servings: 4
  • Difficulty: easy
  • Print
  • Collard greens (usually 1-2 leaves per wrap, the bigger the better)
  • 15-20 Thai basil leaves
  • 1 lb baked chicken breast, diced
  • 1 cup grated carrots
  • 1 cucumber, julienned 
  • 1 red bell pepper, julienned
  • 1 serving of spicy almond dipping sauce or peanut sauce/dressing of your choosing
  1. Collard greens have a thick stem and center rib that need to be dealt with first. Start by trimming the stem, then trim down the center rib so that it’s about the same thickness as the leaf. You can go the extra step of making the leaves even more flexible (and less bitter) by blanching them, i.e. placing them in a large saucepan of boiling water for about 30 seconds, then transferring them to an ice bath. If you don’t plan to use all of your collards at once, wrap them in damp paper towels and store them in your fridge for 3-4 days.
  2. Mix the almond sauce and the diced chicken in a bowl.
  3. To assemble, lay the collard green in front of you, stem pointing towards you. Like a burrito, add your ingredients towards the end of the leaf nearest to you (Thai basil leaves, chicken/sauce, carrots, cucumber, and bell pepper). Begin to roll the collard up tightly, tucking in the sides of the leaf as you go. Wrap in parchment paper or Saran wrap to keep tight while storing/traveling. I like to cut mine in half and home and then wrap them again in tinfoil so they don’t leak and they are easier to eat.
  4. Store pre-made wraps in fridge for up to 3 days. 

Santé!

xoxo, Megan


Black Bean noodles with spicy yogurt sauce

Black Bean Noodles, Corn Salad, and a Creamy Chipotle Roasted Red Pepper Sauce

Recently, a client brought packages of black bean and soybean noodles for me to try. I had never heard of bean noodles, nor did I know what to do with them. However, after reading the nutrition facts and discovering they had a whopping 23 grams of protein and 11 grams of fiber per serving, I knew I had to come up with a recipe for them. This sauce recipe was designed to compliment the black bean flavor while also providing rich nutrients and some extra protein and calcium. Hope you enjoy it as much as I did!

Black Bean Noodles, Corn Salad, and a Creamy Chipotle Roasted Red Pepper Sauce

  • Servings: 4-6
  • Difficulty: moderate
  • Print

Corn Salsa

  • 1 cup frozen or fresh hello corn
  • 1/2 cup grape tomatoes, cut in half
  • 1/2 of a small red onion, diced
  • 1/8 cup of cilantro, roughly chopped
  • 1/2 lime, juiced

Creamy Chipotle Roasted Pepper Sauce

  • 3 chipotle peppers in adobo sauce
  • 1 red bell pepper
  • 1 poblano pepper
  • 1 clove garlic
  • 1/3 cup plain Greek yogurt
  • 1 Tbsp olive oil
  • 1 tsp white vinegar
  • 1 tsp honey
  • 1/2 lime, juiced
  • 1/4 tsp salt
  • 1/4 tsp pepper

Other ingredients:

Directions:

  1. Mix all of the corn salsa ingredients together. Cover and store in fridge until ready to serve.
  2. Preheat oven to 400 degrees. Line baking sheet with foil. Lay the bell pepper, poblano pepper, and garlic clove on their sides. Place the tray into the oven and roast for 20 minutes. Using tongs, flip the peppers and garlic and roast for another 20 minutes. Remove from oven and let cool. Once cool, remove the stems and seeds from the peppers.
  3. In a blender, combine all sauce ingredients and blend until smooth.
  4. Cook the black bean noodles as the package instructs.
  5. In a separate sauce pan, gently heat the sauce until warm but not boiling.
  6. Plate the pasta, add sauce, and top with corn salsa. Garnish with avocado. Recommend serving with carne asada. 

Santé!

xoxo,

Megan

Processed with VSCOcam with f2 preset


Hawaiian Jalapeno Salmon Burger

Hawaiian Jalapeño Salmon Burger with Sriracha Aioli

Summer wouldn’t be complete without BBQs and burgers. With leftover salmon in the fridge, I was inspired to make a burger that was a spin on classic flavors. I love foods that offer a balance between spicy, sweet, and savory. This burger does just that.

Hawaiian Jalapeño Salmon Burger with Sriracha Aioli

  • Servings: 4
  • Difficulty: moderate
  • Print

Burgers

  • 1 pound skin-less wild salmon fillet, chilled in the freeze for about an hour
  • 1/4 cup scallions, diced
  • 1-2 jalapeños, minced
  • 2 Tbsp plain Greek yogurt
  • 2 tsp tabasco sauce
  • 1 egg, beaten
  • pinch of coarse salt and black pepper
  • 4 pineapple slices, 1/2 inch thick (core removed)
  • 1 1/2 cups arugula
  • Hamburger buns (I used Udi’s Gluten-free hamburger buns)

Sauce:

  • 1/4 cup mayo or plain Greek yogurt
  • 2 Tbsp sriracha
  • 1 Tbsp lemon juice
  • 3 fingered pinch of salt
  1. Whisk together the aioli ingredients. Cover and refrigerate to let the flavors meld.
  2. Heat BBQ to 350 degrees Fahrenheit or medium-high.
  3. Take the salmon out of the freezer and cut into 1/3 inch chunks.
  4. In a medium bowl, gently mix the salmon, scallions, jalapeño, yogurt, tabasco, egg, salt and pepper.
  5. Divide the salmon mixture into quarters and shape into burgers with a rubber spatula or your hands.
  6. Once the BBQ is hot, gently place the salmon patties and the pineapple slices on the grill. Cook the patties for 5 minutes on each side, or until an internal temperature of 160 degrees Fahrenheit. Cook pineapple until warm and soft, about 3-5 minutes on each side.
  7. If desired, toast the hamburger buns on grill
  8. Spread aioli on bun. Add arugula, salmon patty, and grilled pineapple. Enjoy!

Santé!

xoxo,

Megan